Fret buzz can be pretty annoying and can make it hard to play the guitar. Turns out, it’s a very common issue and you are not alone. There are numerous reasons behind the buzzing sound. However, adjustment of the truss rod plays an important role here, any issue with the rod can cause the buzz.
If you loosen the truss rod a bit, it can fix the string buzz. When there is extra tension added to the rod, the neck of your guitar becomes straight which causes the strings to become lower and start buzzing.
After playing the guitar for seven years, One thing is pretty clear, guitar buzzing is always bound to occur and it can be caused by numerous things. In this article, I will focus on fixing string buzz that can be fixed by adjusting the truss rod.
Note: If neck relief is not the root cause to your fret buzzing issues, then check out my other articles where I discuss in detail about other causes of buzzing:
- The Secret to Silencing Fret Buzz: A Guide for Guitar and Bass
- Complete Guide To Stop EVERY Type Of Buzzing Noises For Amp!
- Can Bad Guitar Cable Cause Amp Buzz? Reason & Recommendation
What Causes Fret Buzz?
Here are some of the common causes of fret buzz;
1. Not Enough Neck Relief

When the guitar neck is perfectly straight, it lacks neck relief that can cause fret buzz. A guitar neck should be close to straight, but it is not meant to be fully straight.
Guitar necks have a slight dip near the 8th fret which we regard as neck relief. When you travel to different places with a diverse atmosphere or change the setup of your guitar, neck relief is more likely to be disturbed.
The forward bow of the neck is when the neck has a dip in the middle, but if it has no dip, then the neck is a back bow. The back bow neck is usually responsible for the buzz as the open strings buzz on the first fret.
To give your guitar proper neck relief, a truss rod comes into play, it is known for adjusting the neck relief. Adjustment of the neck relief is important if you want to play guitar without any disturbing buzz.
Also Read: Stopping Guitar Warping: Common Causes, Prevention, Fix & Cost
2. Too Low Action
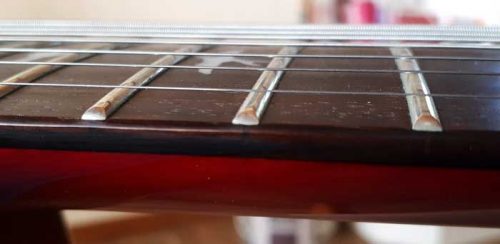
Low action string
If the string action of your guitar is set too low, it can also cause fret buzz. String action is known to be the height of the guitar strings which is measured at a specific fret.
Many guitarists prefer low-string action, but if it becomes too low, the buzzing is inevitable. Due to low string action, the strings come closer to the fret and there are higher chances of unwanted collision between them, which can ultimately cause fret buzz. If you are playing bends, it can also cause the notes to choke too.
To fix this, you will need to slightly increase your guitar action. The heights of the strings certainly play an important role in the overall function of your guitar.
Also Read: Low Action String: Is Fret Buzz Ok? (Guide To Stop & Fix It)
3. Uneven Frets

Uneven guitar fret
Guitar frets are designed to be level with each other, and all of them should be at the right height. When some frets are taller than others, or even shorter, it can create buzzing when you play the guitar. Strings come in contact with the fret and buzzing is created due to uneven frets.
Usually, the strings don’t fret against the lower frets. You can easily identify this issue by looking at the frets closely, if you see big gaps between them, it means that they are uneven.
Another method to check if the frets are uneven is to play every note on your low E string and hear closely for the buzz.
You can do this with every string and check to correlate frets to check the exact point that is causing the buzz. Uneven frets are very common and can easily cause buzzing.
Also Read: Guitar Refret: When, How Often & How To Know (Is It Worth It)
4. Humidity

Extra dry air can also cause fret buzz. Low humidity levels can warp the neck, which results in fret buzz. Humidity is a major factor if you are curious about the maintenance of your guitar. Low humidity levels are not good for your guitar, it can cause damage to many other parts too.
The damage to the neck depends on how low the humidity in your area is and how long you have ignored this issue. That said, adjustments to the truss rod can be made to fix this buzzing issue from the warped neck.
To be vigilant in the future, you need to keep in mind that the preferred humidity level to play guitar is between 40% to 50%. If it’s below that, you might need a humidifier to solve the problem. This should give you the perfect environment to store and even play your guitar without any problem.
5. Dirty Strings and Fretboard

Dirt is also a perpetrator in causing fret buzz. Over time, dirt accumulates on strings and the fretboard and hampers the vibration of your guitar strings.
You can avoid this situation by keeping the strings and the fretboard clean over time. Use soft towels to clean these areas whenever you play the guitar or take it away with you. Keeping good care of your guitar will help you avoid such problems in the future.
How Can Adjusting Truss Rod Fix Fret Buzz?
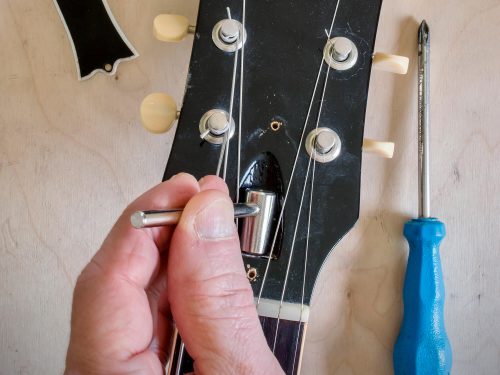
Adjusting truss rod fixes fret buzz because it prevents your guitar neck from being too straight – which is the most common cause of fret buzz.
When adjusting your truss rod, make sure the guitar neck has some relief (it’s slightly curved). This ensures the guitar strings are not touching the guitar frets and cause buzzing.
Even if your guitar is set on a very low action, adjusting the truss rod can also fix buzzing. Proper adjustment of the truss rod can eliminate many potential causes of fret buzz.
5 Steps (& Tools) To Adjusting Guitar Truss Rod
These are some easy steps that you can follow to adjust the truss rod if you are planning to solve the issue of fret buzz. However, there are tools that you will need to adjust the truss rod, make sure you have all the tools before you start adjusting.
Tools Required
Keys
- For a Gibson guitar: you will need a 5/16 nut.
- For USA Fender guitar: you will need a 1/8 inch Allen Key
- For Mexican Fender guitar, you will need a 3/16 inch Allen Key.
- For general metric guitar, you will need a 4mm Allen Key.
Power Drill
You will also need a power drill to remove and put back on the truss rod cover, as it will help you open up and tighten the screw properly. Make sure you don’t fit the screws too tightly.
Feeler Gauge

Feeler Gauge
You will need a feeler gauge to measure the gap between your string and fret after your adjustment. This must be consistent throughout.
Steps To Adjust Truss Rod
Step 1: Locate Truss Rod Adjustment
First, you need to locate the area for truss rod adjustment on your guitar. It can be either at the head shock end or at the end of the body. Once it is located, gather all your tools.
Step 2: Open the truss rod cover
The cover of the truss rod is usually very decorative, it will seem like a mysterious hole underneath it. Here you will need the power drill to remove the cover of the truss rod.
Before moving to the next step, you should tune the strings and adjust the capos at the 1st and the 15th fret.
Step 3: Adjust the truss rod
If the strings are touching the fret tops, it’s clear that they are causing the buzz, and it means that the truss rod is very tight, and it is your task to give the neck relief to stop the buzzing.
To loosen the truss rod, you need to use the keys anti-clockwise, but if you want to make it tight, you will have to use it the opposite way. When you use the keys to the left, it means losing up the truss rod, when you turn it right, you make it tight.
Step 4: Measure the gap
Once you have given the neck relief to the guitar, you will have to use feeler gauges to check the distance between the fret and the strings. You can use a 0.15mm or 0.30mm feeler gauge for this.
Step 5: Add the truss rod cover
Once you have adjusted the truss rod, you need to add the cover back using the power drill. It is a very easy way to adjust the truss rod, and it is not as time-taking as you think, it will only take you about 30-50 minutes to do this all.
Video to demonstrate:
How To Adjust Truss Rod To Fix Fret Buzz: Which Way To Turn?
To fix fret buzz, you need to loosen the truss rod by turning the truss rod nut to the left (anti clockwise) to add neck relief to your guitar.
If you turn it clockwise, it will further tighten up the truss rod. Turning the truss rod nut clockwise tightens the neck. Generally, fret buzz is caused because there isn’t enough neck relief. So you need to loosen the truss rod instead of tightening it.
What Happens If You Don’t Fix Fret Buzz?
If you don’t fix the fret buzz, it will ultimately disturb your fretboard, your play, and even damage your strings. If your neck is not in the right position or the action is too low, it will hamper the functioning of your guitar in the coming future, as excessive buzzing will have adverse effects on both strings and the fretboard. It is not normal for fret or amps to buzz.
FAQs
Can Too Much Neck Relief Cause Fret Buzz?
Too much neck relief can also cause fret buzz. The neck is arranged to be slightly bowed away from the strings, but if the dip is too much, it can certainly result in fret buzz.
Both straightening up the neck too much or giving it too much relief can cause fret buzz, it is better to avoid it.
The dip is meant to give the strings sufficient room to clear the frets and avoid excessive contact. If the buzz is consistent across the frets, it may be due to extra neck relief. You will need a truss rod adjustment to get rid of this situation.
Is Adjusting Guitar Truss Rod Safe?
Adjusting a guitar truss rod is only safe when you are equipped with the right tools and tricks. Otherwise, it can be dangerous as you can ruin the neck. However, for some guitarists, it’s part of their guitar maintenance routine.
Adjusting the truss rod is not as dangerous as people believe it is, but it’s actually the right knowledge that makes the whole process safe.
If you don’t know the right tips and steps, you are more likely to mess things up. It is always suggested to keep all the latest guitar tools with you all the time.
How Often Can You Adjust Truss Rod?
It’s not necessary to adjust the truss rod every other month. You can adjust it once or twice a year. Adjusting the rod every other day will certainly have some consequences, as you will be disturbing the other settings of your guitar, which can open up a new mess for you.
However, whenever you try to adjust the truss rod. Make sure you know all the steps and characteristics of a truss rod. Taking the tolls in hand with minimal understanding has adverse effects on the guitar.


